The database cloning process can be often time consuming, resource intensive and expensive especially for large multi-terabyte databases. This can lead to miss project deadlines or to cause that storage costs grow out of control.
Enterprise Manager 13c Snap Clone instant database cloning allows administrators to create fully functional copies of databases using the capabilities of the underlying storage layer. Snap Clone is also capable to use Data Masking Definitions in order to securely manage test data.
Below video is a demonstration on how to setup Snap Clone with the ZFS storage appliance in order to clone either single instance or pluggable databases (PDBs).
For additional information about Snap Clone capabilities click below.
Last month we held 2 workshops where we went through some capabilities of Oracle Enterprise Manager 13c that help with performance diagnostics, tuning and validation for the Oracle Database.
If you were not able to attend and you want to learn about these capabilities, I recommend you take a look at the recording using the link below.
As IT moves towards virtualization, cloud and hybrid environments, containers, agile developments, etc. Automation and orchestration tools are gaining popularity to build and deliver environments faster and efficiently.
In this post, I want to show how Oracle Enterprise Manager (EM) interacts with 3rd party tools and how this can be used to integrate EM’s functionality with DevOps tools like Ansible or Terraform for configuration management and automation.
Oracle Enterprise Manager (EM) offers a complete tool-set for monitoring, provisioning, upgrade and patching, consolidation, compliance, DBaaS, etc., for the Oracle Database. Oracle Enterprise Manager makes use of Plug-ins and managements packs in order to discover, monitor and manage targets. EM’s functionality can be further extended with connectors and the EM’s extensibility framework in order to interact with 3rd party tools.
You can interact with Oracle Enterprise Manager (EM) in several ways:
Oracle Enterprise Manager Console
Oracle Enterprise Manager Command Line Interface (EMCLI)
Management Repository Views
Web Service REST APIs
Executing SQL via REST APIs (13.4 only)
We can leverage all the EMCLI commands and REST API’s that Oracle EM exposes with tools like Ansible or Terraform for a complete automation and orchestration solution.
One of the requirements for Oracle EM to monitor and manage a target is to deploy an Oracle Management Agent (OMA) to the machine hosting the target. Many organizations use DevOps tools to deploy virtual machines in an automated fashion. We can integrate the Oracle EM’s agent deployment process with these tools. This helps to drive consistency and reduces the efforts and time that administrators spend deploying Oracle Management Agents.
Let’s deploy an OMA to a Linux host using Ansible and Oracle’s EMCLI interface.
First of all, I need to download and install Ansible in a test server. My test server is a small virtual machine running Oracle Linux 7.
Ansible is now installed in the test machine. The Ansible installion will create a directory under “/etc” that contains the configuration, host inventory and roles.
[root@ansible-s02 ~]# cd /etc/ansible/
[root@ansible-s02 ansible]# ls
ansible.cfg  hosts  roles
Our next step is to edit the host inventory file and add both, our Oracle EM server and the machine where we want to deploy the OMA into. This will look similar to my configuration file below.
# This is the default ansible 'hosts' file.
#
# It should live in /etc/ansible/hosts
#
#   - Comments begin with the '#' character
#   - Blank lines are ignored
#   - Groups of hosts are delimited by [header] elements
#   - You can enter hostnames or ip addresses
#   - A hostname/ip can be a member of multiple groups

# Ex 1: Ungrouped hosts, specify before any group headers.

## green.example.com
## blue.example.com
## 192.168.100.1
## 192.168.100.10

# Ex 2: A collection of hosts belonging to the 'webservers' group

## [webservers]
## alpha.example.org
## beta.example.org
## 192.168.1.100
## 192.168.1.110

# If you have multiple hosts following a pattern you can specify
# them like this:

## www[001:006].example.com

# Ex 3: A collection of database servers in the 'dbservers' group

## [dbservers]
##
## db01.intranet.mydomain.net
## db02.intranet.mydomain.net
## 10.25.1.56
## 10.25.1.57

# Here's another example of host ranges, this time there are no
# leading 0s:

## db-[99:101]-node.example.com


[local]
127.0.0.1

[emserver]
10.0.0.28

[emtarget]
10.0.0.11
I also configured a password-less SSH connectivity between the Ansible test machine and both, the EM’s server and the server where I want to deploy the OMA into. After this, I’m going to verify the connectivity from Ansible to both servers.
[root@ansible-s02 ansible]# ansible emserver -m ping -u oracle
 [WARNING]: Platform linux on host 10.0.0.28 is using the discovered Python
interpreter at /usr/bin/python, but future installation of another Python
interpreter could change this. See https://docs.ansible.com/ansible/2.8/referen
ce_appendices/interpreter_discovery.html for more information.

10.0.0.28 | SUCCESS => {
    "ansible_facts": {
        "discovered_interpreter_python": "/usr/bin/python"
    },
    "changed": false,
    "ping": "pong"
}
[root@ansible-s02 ansible]# ansible emtarget -m ping -u oracle
 [WARNING]: Platform linux on host 10.0.0.11 is using the discovered Python
interpreter at /usr/bin/python, but future installation of another Python
interpreter could change this. See https://docs.ansible.com/ansible/2.8/referen
ce_appendices/interpreter_discovery.html for more information.

10.0.0.11 | SUCCESS => {
    "ansible_facts": {
        "discovered_interpreter_python": "/usr/bin/python"
    },
    "changed": false,
    "ping": "pong"
}
I see the SUCCESS flag on both of them. Now is time to develop my .yml file with all the necessary steps to deploy the OMA to the host.
Let’s pause for a minute and review all the available options to deploy an OMA to servers. The list below show’s these options:
Oracle Enterprise Manager Console
Oracle Enterprise Manager Command Line Interface (EMCLI)
Now let’s verify our agent deployment. I’m going to login to the Oracle Enterprise Manager Console and I should be able to see the details of the deployment.
Here you go! The OMA was successfully deployed to my target host. I now need to manually execute the “root.sh” script, this because I didn’t specify a privileged credential during the deployment.
Hope this helps to demonstrate the flexibility of Oracle’s EM and also as an example on how to integrate it’s functionality with DevOps tools like Ansible. This is not by any means the best way to deploy an agent for your particular environment but rather an example of how to integrate EM with Ansible.
I’ve been getting many questions about the upgrade process of Enterprise Manager (EM). EM upgrade process is a out-of-place upgrade, this means that you need to install a new Oracle Home (OH) and then perform the upgrade of your EM.
EM 13.4 was just released last week and this is the perfect time to start upgrading your old EM installation to 13.4.
In this post I will show you the upgrade process to 13.4 version. The current environment is as below:
Oracle Enterprise Manager 13.PG (single OMS)
Oracle Database 12.1.0.2 (OMR)
Oracle Linux 7 64-bit
First things first. You need to take a look at the Oracle EM documentation and make sure you comply with all the pre-requisites before attempting the upgrade.
As you can see from my current environment configuration, I’m running Oracle Database 12.1.0.2. I’m going to upgrade the OMR DB to 19C as part of this upgrade. The reason? Pretty simple, 19C is the long term release version. If you want to know more about the lifetime support of Oracle products follow below link.
My first step is to download the Oracle DB 19C software and install an Oracle Home (OH). Please be sure you have a valid backup of your database before starting.
Once the OH is ready I’m going to run the pre-upgrade utility as below:
$ export ORACLE_HOME=/u01/app/oracle/product/12c/dbhome_1
$ /u01/app/oracle/product/19c/dbhome_1/jdk/bin/java -jar /u01/app/oracle/product/19c/dbhome_1/rdbms/admin/preupgrade.jar TERMINAL TEXT
Report generated by Oracle Database Pre-Upgrade Information Tool Version
19.0.0.0.0 Build: 5 on 2020-02-05T21:16:38

Upgrade-To version: 19.0.0.0.0

=======================================
Status of the database prior to upgrade
=======================================
      Database Name:  EMREPO
     Container Name:  emrepo
       Container ID:  0
            Version:  12.1.0.2.0
     DB Patch Level:  No Patch Bundle applied
         Compatible:  12.1.0.2.0
          Blocksize:  8192
           Platform:  Linux x86 64-bit
      Timezone File:  18
  Database log mode:  NOARCHIVELOG
           Readonly:  FALSE
            Edition:  EE

  Oracle Component                       Upgrade Action    Current Status
  ----------------                       --------------    --------------
  Oracle Server                          [to be upgraded]  VALID
  JServer JAVA Virtual Machine           [to be upgraded]  VALID
  Oracle XDK for Java                    [to be upgraded]  VALID
  Oracle Workspace Manager               [to be upgraded]  VALID
  Oracle XML Database                    [to be upgraded]  VALID
  Oracle Java Packages                   [to be upgraded]  VALID

...

==================
PREUPGRADE SUMMARY
==================
  /u01/app/oracle/cfgtoollogs/emrepo/preupgrade/preupgrade.log
  /u01/app/oracle/cfgtoollogs/emrepo/preupgrade/preupgrade_fixups.sql
  /u01/app/oracle/cfgtoollogs/emrepo/preupgrade/postupgrade_fixups.sql

Execute fixup scripts as indicated below:

Before upgrade:

Log into the database and execute the preupgrade fixups
@/u01/app/oracle/cfgtoollogs/emrepo/preupgrade/preupgrade_fixups.sql

After the upgrade:

Log into the database and execute the postupgrade fixups
@/u01/app/oracle/cfgtoollogs/emrepo/preupgrade/postupgrade_fixups.sql

Preupgrade complete: 2020-02-05T21:16:38
I’m going to execute the preupgrade_fixups.sql script on the OMR first.
$ sqlplus / as sysdba

SQL*Plus: Release 12.1.0.2.0 Production on Wed Feb 5 22:24:24 2020

Copyright (c) 1982, 2014, Oracle.  All rights reserved.


Connected to:
Oracle Database 12c Enterprise Edition Release 12.1.0.2.0 - 64bit Production
With the Partitioning, OLAP, Advanced Analytics and Real Application Testing options

SQL> @/u01/app/oracle/cfgtoollogs/emrepo/preupgrade/preupgrade_fixups.sql
Executing Oracle PRE-Upgrade Fixup Script

Auto-Generated by:       Oracle Preupgrade Script
                         Version: 19.0.0.0.0 Build: 5
Generated on:            2020-02-05 21:16:32

For Source Database:     EMREPO
Source Database Version: 12.1.0.2.0
For Upgrade to Version:  19.0.0.0.0

Preup                             Preupgrade
Action                            Issue Is
Number  Preupgrade Check Name     Remedied    Further DBA Action
------  ------------------------  ----------  --------------------------------
    1.  purge_recyclebin          YES         None.
    2.  invalid_objects_exist     NO          Manual fixup recommended.
    3.  mv_refresh                NO          Manual fixup recommended.
    4.  dictionary_stats          YES         None.
    5.  tablespaces_info          NO          Informational only.
                                              Further action is optional.
    6.  rman_recovery_version     NO          Informational only.
                                              Further action is optional.

The fixup scripts have been run and resolved what they can. However,
there are still issues originally identified by the preupgrade that
have not been remedied and are still present in the database.
Depending on the severity of the specific issue, and the nature of
the issue itself, that could mean that your database is not ready
for upgrade.  To resolve the outstanding issues, start by reviewing
the preupgrade_fixups.sql and searching it for the name of
the failed CHECK NAME or Preupgrade Action Number listed above.
There you will find the original corresponding diagnostic message
from the preupgrade which explains in more detail what still needs
to be done.

PL/SQL procedure successfully completed.
Next steps are to shutdown the database instance, move all the network, parameter and password files from the old OH to the new OH.
$ export ORACLE_HOME=/u01/app/oracle/product/19c/dbhome_1
$ export PATH=${ORACLE_HOME}/bin:$PATH
$ lsnrctl start
...
The listener supports no services
The command completed successfully
Startup the DB in upgrade mode.
$ sqlplus / as sysdba
SQL> startup upgrade
SQL*Plus: Release 19.0.0.0.0 - Production on Wed Feb 5 22:31:34 2020
Version 19.3.0.0.0

Copyright (c) 1982, 2019, Oracle.  All rights reserved.

Connected to an idle instance.

SQL> ORA-32004: obsolete or deprecated parameter(s) specified for RDBMS instance
ORACLE instance started.

Total System Global Area 1577054672 bytes
Fixed Size		    8896976 bytes
Variable Size		 1006632960 bytes
Database Buffers	  553648128 bytes
Redo Buffers		    7876608 bytes
Database mounted.
Database opened.
SQL> exit
Execute dbupgrade tool.
$ $ORACLE_HOME/bin/dbupgrade

Argument list for [/u01/app/oracle/product/19c/dbhome_1/rdbms/admin/catctl.pl]
For Oracle internal use only A = 0
Run in                       c = 0
Do not run in                C = 0
Input Directory              d = 0
Echo OFF                     e = 1
Simulate                     E = 0
Forced cleanup               F = 0
Log Id                       i = 0
Child Process                I = 0
Log Dir                      l = 0
Priority List Name           L = 0
Upgrade Mode active          M = 0
SQL Process Count            n = 0
SQL PDB Process Count        N = 0
Open Mode Normal             o = 0
Start Phase                  p = 0
End Phase                    P = 0
Reverse Order                r = 0
AutoUpgrade Resume           R = 0
Script                       s = 0
Serial Run                   S = 0
RO User Tablespaces          T = 0
Display Phases               y = 0
Debug catcon.pm              z = 0
Debug catctl.pl              Z = 0

catctl.pl VERSION: [19.0.0.0.0]
           STATUS: [Production]
            BUILD: [RDBMS_19.3.0.0.0DBRU_LINUX.X64_190417]


...

------------------------------------------------------
Phases [0-107]         End Time:[2020_02_05 22:58:13]
------------------------------------------------------

Grand Total Time: 1490s

 LOG FILES: (/u01/app/oracle/product/19c/dbhome_1/cfgtoollogs/emrepo/upgrade20200205223311/catupgrd*.log)

Upgrade Summary Report Located in:
/u01/app/oracle/product/19c/dbhome_1/cfgtoollogs/emrepo/upgrade20200205223311/upg_summary.log

Grand Total Upgrade Time:    [0d:0h:24m:50s]
Start the DB instance and execute the post_upgrade.sql script.
$ sqlplus / as sysdba

SQL*Plus: Release 19.0.0.0.0 - Production on Wed Feb 5 22:58:51 2020
Version 19.3.0.0.0

Copyright (c) 1982, 2019, Oracle.  All rights reserved.

Connected to an idle instance.

SQL> startup
ORA-32004: obsolete or deprecated parameter(s) specified for RDBMS instance
ORACLE instance started.

Total System Global Area 1577054672 bytes
Fixed Size		    8896976 bytes
Variable Size		 1056964608 bytes
Database Buffers	  503316480 bytes
Redo Buffers		    7876608 bytes
Database mounted.
Database opened.
SQL>
SQL> @/u01/app/oracle/cfgtoollogs/emrepo/preupgrade/postupgrade_fixups.sql

Session altered.


PL/SQL procedure successfully completed.


PL/SQL procedure successfully completed.


PL/SQL procedure successfully completed.
...
PL/SQL procedure successfully completed.


Session altered.
Modify the compatible parameter to 19C.
SQL> show parameter compatible

NAME                                 TYPE        VALUE
------------------------------------ ----------- ------------------------------
compatible                           string      12.1.0.2.0
noncdb_compatible                    boolean     FALSE
SQL> alter system set compatible='19.0.0' scope=spfile;

System altered.
I’m going to also modify some parameters required by EM 13.4.
SQL> alter system set optimizer_adaptive_plans=FALSE scope=spfile;

System altered.
SQL> alter system set "_allow_insert_with_update_check" = true scope=spfile;

System altered.
SQL> alter system set "_optimizer_nlj_hj_adaptive_join"= FALSE scope=both sid='*';

System altered.
SQL> alter system set "_optimizer_strans_adaptive_pruning" = FALSE scope=both sid='*';

System altered.
SQL> alter system set "_px_adaptive_dist_method" = OFF scope=both sid='*';
 alter system set "_sql_plan_directive_mgmt_control" = 0 scope=both sid='*';
 alter system set "_optimizer_dsdir_usage_control" = 0 scope=both sid='*';
 alter system set "_optimizer_use_feedback" = FALSE scope=both sid='*';
 alter system set "_optimizer_gather_feedback" = FALSE scope=both sid='*';
 alter system set "_optimizer_performance_feedback" = OFF scope=both sid='*';

System altered.

SQL>
System altered.

SQL>
System altered.

SQL>
System altered.

SQL>
System altered.

SQL>
System altered.
Verify that the package SYS.DBMS_OBJECTS_APPS_UTILS is present and valid.
SQL> Select * from all_objects where object_name = 'DBMS_OBJECTS_APPS_UTILS' and object_type = 'PACKAGE BODY' and status = 'VALID';

OWNER
--------------------------------------------------------------------------------
OBJECT_NAME
--------------------------------------------------------------------------------
SUBOBJECT_NAME
--------------------------------------------------------------------------------
 OBJECT_ID DATA_OBJECT_ID OBJECT_TYPE             CREATED   LAST_DDL_
---------- -------------- ----------------------- --------- ---------
TIMESTAMP           STATUS  T G S  NAMESPACE
------------------- ------- - - - ----------
EDITION_NAME
--------------------------------------------------------------------------------
SHARING            E O A
------------------ - - -
DEFAULT_COLLATION
--------------------------------------------------------------------------------
D S CREATED_APPID CREATED_VSNID MODIFIED_APPID MODIFIED_VSNID
- - ------------- ------------- -------------- --------------
SYS
DBMS_OBJECTS_APPS_UTILS

     11409                PACKAGE BODY            14-JUN-18 06-FEB-20
2020-02-05:22:37:05 VALID   N N N          2

NONE               N Y N

N N


1 row selected.
Restart the OMR database.
At this point we are ready to launch the EM 13.4 install wizard. Download the EM 13.4 software from the link below.
I’m going to un-select the security updates box and click Next.
I will skip the software updates and click Next.
The wizard will verify that the host complies with all the required pre-requites. If all the checks passed then click Next.
I’ll chose to upgrade my previous EM installation. There are many options here. You could only install the EM 13.4 software and then upgrade at a later time. This is quite useful when you try to reduce upgrade downtime.
Type the new ORACLE_HOME location for this installation.
Then type the OMR credentials. At this point make sure you have a valid DB and OMS backup.
The wizard will run through a couple of checks and provide recommendations. Based on this I’m going to perform the steps below:
Copy the emkey to repos
$ ./emctl config emkey -copy_to_repos
Oracle Enterprise Manager Cloud Control 13c Release 3
Copyright (c) 1996, 2018 Oracle Corporation.  All rights reserved.
Enter Enterprise Manager Root (SYSMAN) Password :
The EMKey has been copied to the Management Repository. This operation will cause the EMKey to become unsecure.
After the required operation has been completed, secure the EMKey by running "emctl config emkey -remove_from_repos".
Shutdown the EM agent
$ cd $AGENT_HOME/bin
$ ./emctl stop agent
Shutdown OMS
$ cd $ORACLE_HOME/bin
$ ./emctl stop oms -all
Oracle Enterprise Manager Cloud Control 13c Release 3
Copyright (c) 1996, 2018 Oracle Corporation.  All rights reserved.
Stopping Oracle Management Server...
WebTier Successfully Stopped
Oracle Management Server Successfully Stopped
Oracle Management Server is Down
JVMD Engine is Down
Stopping BI Publisher Server...
BI Publisher Server Successfully Stopped
AdminServer Successfully Stopped
BI Publisher Server is Down
The next screen is going to show the plugins that are going to be upgraded.
Now you can chose if you need additional plugins to be deployed during the install process.
The next screen will prompt for the Weblog Admin Server password.
Next two screens will ask about BI Publisher shared storage and ports used by EM.
Now you can review all the inputs before starting the install and upgrade process.
Click Upgrade to start the install and upgrade.
The last step is to run the allroot.sh script.
And finally the summary report.
Launch you EM login URL and verify the version in the about page.
Now you should start you EM agent and start upgrading all of them.
I got several interesting questions last week during my presentation about Oracle Enterprise Manager (EM) 13.3 and Exadata at the East Coast Oracle Conference 2019.
One of them was related on how to patch a DB home using EM 13.3 and I’ll try to show it on this post.
First, keep in mind that in order for EM to download patches it needs to be able to connect to the My Oracle Support (MOS) site using valid credentials. There’s an offline patching option well, I won’t cover that setup on this post though.
Once EM is able to communicate with the MOS site, it will automatically (EM job) download the latest patch recommendation for the managed targets. Let’s navigate to Enterprise -> Provisioning and Patching -> Patching and Updates.
The Patches and Updates home page is divided in 4 sections.
A) Quick Links will open a new page linked to MOS site
B) Patch Recommendation for the managed targets in EM
C) Patch Search allows you to search for specific patches
D) Plans created are shown in this section
Let’s take a look at the patch recommendations. They can be viewed by classification or target type.
Click on the bar for Database Instance patches to go to the Patch Details page. As shown below the Details page provides an easy to read table with all the recommendations for that target type.
Select the patch from the table and automatically the patch details is populated below. In this example we are looking at the latest OJVM PSU for the 12.1.0.2 version.
At the top of the table you have several options:
Create a patching plan
Add the patch to an existing patching plan
Print the patching information
Download the patch (to you computer or to the EM Software Library)
I’m going to download this patch to the EM’s Software Library to apply it later.
Next, we need to create a Patch Plan. This plan will contain all the selected patches and will be analyzed against the Oracle Homes in order to find conflicts or potential issues.
Once the Patch Plan is created we can then click on it to navigate to the Patch Wizard. The first page page of the Wizard is the Patch Plan Information page, it allows us to see and amend the Patch Plan name and to grant access to other users and/or roles.
The Patches page provides information about the patches currently added to the Plan. You can add and/or remove patches here.
The Deployment Options page let’s you choose if you want to perform an “out of place” (recommended) or an “in place” patching. There are several caveats here:
You have to provide the new Oracle Home (OH) name if “out of place” patching is selected
You need to have enough free space for the new OH and for the staging directory
You need to provide both the normal and the privileged credentials for the host
The next step is the Patch Plan Validation. Basically EM will validate all the patches against the Oracle Home.
Analysis in Progress
If the validation is successful, you can proceed to deploy the patches to the Oracle Home.
Ready for Deployment
Finally, you have to select if you want to deploy the patch immediately or at a different schedule.
Deploy Confirmation
Wait for the procedure to apply the patches. Once the procedure finishes you will see the success page along with a link to view the details of the deployment.
Deployment Successful
Note that after the patches are successful deployed, the Plan will be locked. Also, you have the option of creating a template of the Plan so you can deploy it to different targets later.
Important note: This procedure is available for 12.1.0.x and prior versions. If you want to patch 12.2, 18c and 19c versions then you must use Fleet Maintenance feature.
Patching the Oracle Database 12.2 using Enterprise Manager Requires the EM DB Plugin 13.2.2 and Fleet Maintenance (Doc ID 2237521.1)
I have done some testing on the OEM 13c DB Plugin 13.3.2 (PG) for the last several months. I highlighted some of the changes in this new version in a previous post:
During the last Dallas Oracle User Group (DOUG) conference I got couple of questions though. I will try to answer them as best as possible.
OEM 13c Top Activity page has been deprecated
I don’t know the reason why, but is a fact. Oracle is moving towards getting rid of the Top Activity page and replacing this with ASH analytics. As I keep mentioning… we are so used to Top Activity page and this will be a shocking factor for users.
We know that Internet browsers such Chrome, IE or Firefox will no longer support Adobe Flash starting next year. Oracle is now using JET instead of Flash. But the Top Activity page was solely using Flash.
There’s a trick though. Top Activity link will show at the end of the Performance Home page. So you can still access it (while your browser permits it).
ASH Analytics can’t be used for our monitoring screens
This was a really good question. There are many companies that have big screens in their command centers to monitor mission critical databases. The Top Activity page is always shown in those screens and is really handful by having a quick glance on the DB’s performance.
Top Activity page will refresh every 15 seconds but the highlighted time frame (5 minutes) always moves to the very end. This means that we only monitor the last 5 minutes every single time. We notices a different behavior with ASH analytics though.
When ASH analytics refreshes, the highlighted time frame won’t move to the very end. This means that we are only monitoring the same 5 minutes (static). See the picture below taken from my lab running 13.2 version:
ASH Analytics EM 13.2 version
I confirmed this behavior in 12c, 13.1, 13.2 and 13.3 versions of the DB Plugin. But there are good news. This didn’t happen in the latest 13.3 PG version using JET. The highlighted time frame always moves to the very end thus showing information of the last 5 minutes every time.
This is another reason to upgrade to the latest version of EM.
You can only use DB 19c as a repository if you are using the latest DB plugin
Yes. OEM 13c PG was released with full 19c support. So, the best thing to do is to upgrade to 13c PG version if you want to monitor or use 19c as your DB repository.
If you are running Oracle Enterprise Manager (OEM) 13c, you should (must) be using Agent Gold Images (GI). They provide an easy way to manage the lifecycle of you OEM agents from a fancy dashboard.
The problem came while removing a Gold Image Versions in OEM 13.3PG. Guess what? The whole Gold Image disappeared!!!
This is not the expected behavior for this. The point here is that there were agents still subscribed to the GI. So even trying to create a new GI won’t allow us to subscribe those agents as they were still subscribed to the GI that was missing.
Using some Sherlock Holmes’ skills found that the GI was in fact still present in the OMR tables. You can use the query below to see all the GI currently living in your system.
SELECT image_name FROM MGMT$EM_GAI_ENTITIES;
What about the agents still subscribed to this GI?
SELECT * from EM_GI_AGENT_SUBSCRIBE WHERE gold_image_series='<GI Name>';
OK, so there should be something wrong here. After working with Oracle Support they found the issue and provided a patch. Please refer to Patch 28817766.
Apply this patch on top of your OEM 13.3 PG and you should see the GI again. If you are not able to see the GI, then create a new one with the same old name. Everything should look fine after that.
First, keep in mind that you should upgrade your OEM 13c to the latest version (13.3PG). I discussed some new features of this version in a previous post.
1. Oracle Database 19c has been certified as a OEM Repository Database (OMR). This means that is time to upgrade your repository to a long term support release.
More info : EM 13.3C: Certification of 19c Database as an EM Repository Database and as a Managed Target (Doc ID 2541711.1)
2. Oracle EM 13.3.2 Bundle Patch (BP) is available. You must keep up with patching if you don’t want to encounter issues down the road.
More info: Enterprise Manager Cloud Control Database Plugin 13.3.2.0 Bundle Patch Bug List (Doc ID 2554474.1)
3. The latest EM 13.3.2 BP 3 has support for Oracle Autonomous Database (ATP-D). So, if you are running ATP in dedicated mode and you want to use OEM to manage your DB, is time to patch!!
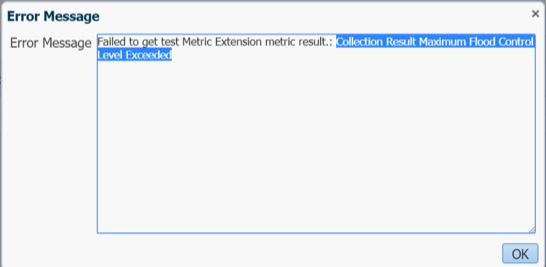
I recently had an issue in OEM 12c while creating a Metric Extension that was returning more than 5000 records. In OEM 12c versions 12.1.0.4 and 12.1.0.5 there a flood control mechanism in order to limit the maximum number of rows for a metric.
You can also verify this in the agent_inst/sysman/log/gcagent.log file:
2018-10-08 13:38:50,330 [66:F119EDFE:GC.Executor.1 (host:hostname:ll_host_config) (host:hostname:ll_host_config:ECM_OS_COMPONENT)] WARN – Result set exceeding min flood control level
The solution is provided in the MOS Doc Id 1499381.1
We didn’t want to proceed to apply the patch but rather we limited the number of rows from the Metric Extension.
This OMS patch is available also for 13.1 version and the bug states that is fixed in 13.2 versions.