Oracle Enterprise Manager 13c Snap Clone Demo

The database cloning process can be often time consuming, resource intensive and expensive especially for large multi-terabyte databases. This can lead to miss project deadlines or to cause that storage costs grow out of control.

Enterprise Manager 13c Snap Clone instant database cloning allows administrators to create fully functional copies of databases using the capabilities of the underlying storage layer. Snap Clone is also capable to use Data Masking Definitions in order to securely manage test data.

Below video is a demonstration on how to setup Snap Clone with the ZFS storage appliance in order to clone either single instance or pluggable databases (PDBs).

For additional information about Snap Clone capabilities click below.


Thanks,
Alfredo

Bye Bye Flash!

Formerly named Macromedia Flash (now Adobe Flash) player was really popular in the 2000’s. I remember learning it to add animation to Web Sites I was developing during my college years. Flash has also been the target of hackers to insert viruses, hence posing several security concerns to enterprises and home users.

In the IT world, change is the only constant. So, is time to move on to the next thing.

Adobe Flash is widely used in several Oracle sites. My Oracle Support, Oracle Business Intelligence EE, Oracle Enterprise Manager Cloud Control, etc.
Google just announced that it will stop supporting Flash in Google Chrome at the end of 2020.

https://blog.google/products/chrome/saying-goodbye-flash-chrome/

That means that you will loose all those fancy graphs in your browser. Well, not quite. Oracle started to provide patches and upgrades to get rid of Adobe Flash and use JET instead.

We still have more than a year for this to happen, but is the perfect time to start planning to switch. Is this already in your plans?

Thanks,
Alfredo

Oracle Autonomous Data Warehouse – What is it?

Oracle Autonomous Data Warehouse (ADW) is one of the so-called DB as a Service (DBaaS) or probably we should call it Data Warehouse as a Service (DWaaS) with the difference that this service is completely automatic and autonomous.  

This service is comprised by an Oracle Database (of course) already pre-configured for analytics, data lakes and data warehouse workloads. This Oracle Database (PDB) has 18c features running on Exadata hardware. Oracle Exadata software is 18c with features like In-Memory delivered from the cell server.  

There’s a service console that helps to manage the ADW services.

On top of this, Machine Learning (ML) tools help with data analysis and data models.   Development tools like SQL Developer are useful to create objects, load data and more.  

Let’s now talk about tasks that happen automatically:  

Automatic statistics gathering during direct-path load operations

Automatic tuning

Automatic Partitioning

Automatic In-Memory

Automatic Indexing (soon)

Automatic Compression

Automatic Tablespace Management

Automated backups and patching  

ADW is also capable of repair itself. Machine Learning is used to detect anomalies and uses pattern recognition to determine if this problem is already in the problem knowledge-base. If is a known problem, it will apply the fix automatically.  

On the security side all the information is encrypted at rest. This means that backups and all data in the tablespaces is encrypted using TDE.

The connectivity between ADW and the rest of the world is secured be default. Oracle provides a wallet file that contains all the connectivity information required to login.

If you open this file you’ll notice that all connectivity is being done through SSL.

 (security=(ssl_server_cert_dn=… 

Provisioning is quite easy using the service console.   From the main dashboard you can click on “Create a data warehouse” button.

Select the Workload type between Autonomous Data Warehouse ADW or Autonomous Transaction Processing ATP loads.


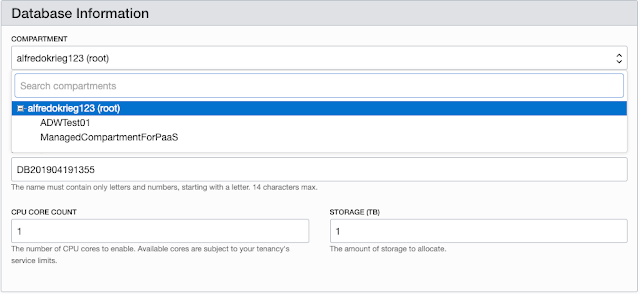
Next you choose a compartment where the ADW database is going to live. For this example I’m going to choose ADWTest01 compartment. It is not recommended to use the root compartment.


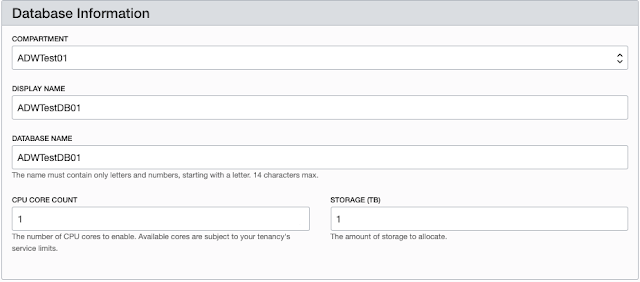
Then we are going to set the Display and Database names. For this example, I’m choosing 1 OCPU and 1 TB of storage. Keep in mind that ADW is elastic, this means we can add more OCPUs and Storage on the fly without the need for downtime.


From the Administrator Credentials section we are going to set the ADMIN account password.


Next is license type. You can choose to use a license that you already own or subscribe to a new one.


Last but not least is the Tags section. You can add a tag to this ADW database to better manage it inside your tenancy.


Let’s now click Create Autonomous Database and wait few minutes for OCI to provision it.


The orange ADW icon will turn green once the ADW database is fully provisioned.


In my next post I’ll cover how to connect o the ADW database and how to load data to it.
 
Thanks,
Alfredo

2017 April PSU – OEM sending tablespace related alerts every collection schedule

I noticed that several alerts related to tablespace full were sent from OEM every collection schedule. At first sight I thought this may be related to OEM itself but after spending some significant time in MOS found a bug note stating that the 2017 April PSU patch was responsible.


The issue is that dba_tablespace_usage_metrics is not accounting for autoextend datafiles. So even if you add a new datafile, your used space will continue be reported as it was before.
You need to apply patch 26198757 on top of April PSU.
Hope this help you to avoid all this noise and happy patching.
Thanks,

Alfredo

OMS responded illegally [ERROR- Failed to Update Target Type Metadata] in 13c R2

I want to discuss about this OMS error coming from the agent’s heartbeat status. The agent shows with an unreachable status but is actually up and running.
$: emctl status agent
Oracle Enterprise Manager Cloud Control 13c Release 2
Copyright (c) 1996, 2016 Oracle Corporation.  All rights reserved.
—————————————————————
Agent Version          : 13.2.0.0.0
OMS Version            : (unknown)
Last Reload            : (none)
Last successful upload                       : (none)
Last attempted upload                        : (none)
Total Megabytes of XML files uploaded so far : 0
Number of XML files pending upload           : 2,210
Size of XML files pending upload(MB)         : 2.89
Available disk space on upload filesystem    : 56.39%
Collection Status                            : Collections enabled
Heartbeat Status       : OMS responded illegally [ERROR- Failed to Update Target Type Metadata]
Last attempted heartbeat to OMS              : 2017-01-24 21:09:21
Last successful heartbeat to OMS             : (none)
Next scheduled heartbeat to OMS              : 2017-01-24 21:09:51
—————————————————————
Agent is Running and Ready
In this case the agent is not able to upload the metadata because is different in the OMS.
This is mainly due to a patch in the agent side that is missing in the OMS. By mistake I applied the latest bundle patch to the agent before applying it to the OMS.
Just another proof that any patches have to be installed to the OMS first then the agents.
Thanks,

Alfredo

Upgrade OPatch for OEM 13c R2 Agents

Opatch utility has to be updated often as Oracle delivers regular updates to it. I was used to version 12 and it only required an overwrite of the OPatch directory. Well, not anymore with version 13c R2.
I will walk you through an OPatch upgrade from 13.8 to 13.9 version.
First export your agent ORACLE_HOME:
$: export ORACLE_HOME=/u01/oracle/oemagent/agent_13.2.0.0.0/
Verify the current OPatch version:
$: $ORACLE_HOME/OPatch/opatch version
OPatch Version: 13.8.0.0.0
OPatch succeeded.
Download and unzip the 13.9 version in a temporary directory:
$: unzip p6880880_139000_Generic.zip
Archive:  p6880880_139000_Generic.zip
   creating: 6880880/
  inflating: 6880880/README.txt
  inflating: 6880880/opatch_generic.jar
  inflating: 6880880/version.txt
As you can see, now we have some zip files and a java file. Execute java to upgrade OPatch as follows:
$: $ORACLE_HOME/jdk/bin/java -jar opatch_generic.jar -silent oracle_home=$ORACLE_HOME
Launcher log file is /tmp/OraInstall2017-01-19_08-47-21PM/launcher2017-01-19_08-47-21PM.log.
Extracting the installer . . . . Done
Checking if CPU speed is above 300 MHz.   Actual 3000.000 MHz    Passed
Checking swap space: must be greater than 512 MB.   Actual 16383 MB    Passed
Checking if this platform requires a 64-bit JVM.   Actual 64    Passed (64-bit not required)
Checking temp space: must be greater than 300 MB.   Actual 18842 MB    Passed
Preparing to launch the Oracle Universal Installer from /tmp/OraInstall2017-01-19_08-47-21PM
Installation Summary
Disk Space : Required 6 MB, Available 5,229 MB
Feature Sets to Install:
        Next Generation Install Core 13.9.1.0.0
        OPatch 13.9.1.0.0
        OPatch Auto OPlan 13.9.1.0.0
Session log file is /tmp/OraInstall2017-01-19_08-47-21PM/install2017-01-19_08-47-21PM.log
Loading products list. Please wait.
 1%
 40%
Loading products. Please wait.
 43%
 …
 97%
 99%
Updating Libraries
Starting Installations
 1%
 …
 91%
 92%
Install pending
Installation in progress
 Component : oracle.swd.opatch 13.9.1.0.0
Copying files for ‘oracle.swd.opatch 13.9.1.0.0 ‘
 Component : oracle.glcm.osys.core 13.9.1.0.0
Copying files for ‘oracle.glcm.osys.core 13.9.1.0.0 ‘
 Component : oracle.glcm.oplan.core 13.9.1.0.0
Copying files for ‘oracle.glcm.oplan.core 13.9.1.0.0 ‘
 Component : oracle.glcm.opatch.common.api 13.9.1.0.0
Copying files for ‘oracle.glcm.opatch.common.api 13.9.1.0.0 ‘
 Component : oracle.glcm.opatchauto.core 13.9.1.0.0
Copying files for ‘oracle.glcm.opatchauto.core 13.9.1.0.0 ‘
Install successful
Post feature install pending
Post Feature installing
 Feature Set : apache_commons_cli_lib
 Feature Set : oracle.glcm.opatchauto.core.actions.classpath
Post Feature installing ‘apache_commons_cli_lib’
 Feature Set : oracle.glcm.opatchauto.core.binary.classpath
 Feature Set : oracle.glcm.osys.core.classpath
Post Feature installing ‘oracle.glcm.opatchauto.core.binary.classpath’
Post Feature installing ‘oracle.glcm.osys.core.classpath’
 Feature Set : apache_commons_compress_lib
 Feature Set : oracle.glcm.opatchauto.core.wallet.classpath
Post Feature installing ‘oracle.glcm.opatchauto.core.actions.classpath’
Post Feature installing ‘apache_commons_compress_lib’
 Feature Set : oracle.glcm.opatchauto.core.classpath
Post Feature installing ‘oracle.glcm.opatchauto.core.wallet.classpath’
Post Feature installing ‘oracle.glcm.opatchauto.core.classpath’
 Feature Set : oracle.glcm.opatch.common.api.classpath
 Feature Set : oracle.glcm.oplan.core.classpath
Post Feature installing ‘oracle.glcm.opatch.common.api.classpath’
Post Feature installing ‘oracle.glcm.oplan.core.classpath’
Post feature install complete
String substitutions pending
String substituting
 Component : oracle.swd.opatch 13.9.1.0.0
String substituting ‘oracle.swd.opatch 13.9.1.0.0 ‘
 Component : oracle.glcm.osys.core 13.9.1.0.0
String substituting ‘oracle.glcm.osys.core 13.9.1.0.0 ‘
 Component : oracle.glcm.oplan.core 13.9.1.0.0
String substituting ‘oracle.glcm.oplan.core 13.9.1.0.0 ‘
 Component : oracle.glcm.opatch.common.api 13.9.1.0.0
String substituting ‘oracle.glcm.opatch.common.api 13.9.1.0.0 ‘
 Component : oracle.glcm.opatchauto.core 13.9.1.0.0
String substituting ‘oracle.glcm.opatchauto.core 13.9.1.0.0 ‘
String substitutions complete
Link pending
Linking in progress
 Component : oracle.swd.opatch 13.9.1.0.0
Linking ‘oracle.swd.opatch 13.9.1.0.0 ‘
 Component : oracle.glcm.osys.core 13.9.1.0.0
Linking ‘oracle.glcm.osys.core 13.9.1.0.0 ‘
 Component : oracle.glcm.oplan.core 13.9.1.0.0
Linking ‘oracle.glcm.oplan.core 13.9.1.0.0 ‘
 Component : oracle.glcm.opatch.common.api 13.9.1.0.0
Linking ‘oracle.glcm.opatch.common.api 13.9.1.0.0 ‘
 Component : oracle.glcm.opatchauto.core 13.9.1.0.0
Linking ‘oracle.glcm.opatchauto.core 13.9.1.0.0 ‘
Linking in progress
Link successful
Setup pending
Setup in progress
 Component : oracle.swd.opatch 13.9.1.0.0
Setting up ‘oracle.swd.opatch 13.9.1.0.0 ‘
 Component : oracle.glcm.osys.core 13.9.1.0.0
Setting up ‘oracle.glcm.osys.core 13.9.1.0.0 ‘
 Component : oracle.glcm.oplan.core 13.9.1.0.0
Setting up ‘oracle.glcm.oplan.core 13.9.1.0.0 ‘
 Component : oracle.glcm.opatch.common.api 13.9.1.0.0
Setting up ‘oracle.glcm.opatch.common.api 13.9.1.0.0 ‘
 Component : oracle.glcm.opatchauto.core 13.9.1.0.0
Setting up ‘oracle.glcm.opatchauto.core 13.9.1.0.0 ‘
Setup successful
Save inventory pending
Saving inventory
 93%
Saving inventory complete
 94%
Configuration complete
Logs successfully copied to /u01/app/oraInventory/logs.
Verify the new OPatch version

$: $ORACLE_HOME/OPatch/opatch version
OPatch Version: 13.9.1.0.0
OPatch succeeded. 
Thanks,

Alfredo

OEM 13c New Features – System Broadcast

I can’t finish the year without a post about OEM 13c. I finally had some time to install it and from first hand go through its new features.  I find this “System Broadcast” feature so useful, especially when you have tons of users using OEM.
You can try to email users, give them a call but they will always forget about the next maintenance window and call you right away when OEM is not available. This feature helps you to send a notification to all the users or a particular list of users.
System Broadcast messages (up to 200 characters) can only be sent using EMCLI, there’s no graphical option yet.
Here’s an example on how to send a message to a user named OEMADMIN:

$ emcli send_system_broadcast -toOption=”SPECIFIC” -to=”OEMADMIN” -message=”OEM will be down for maintenance Friday December 30th”
Successfully requested to send System Broadcast to users.

This is what you see once you login to OEM console:


Send the message to all the users:


$ emcli send_system_broadcast -toOption=”ALL” -message=”OEM will be down for maintenance Friday December 30th”
Successfully requested to send System Broadcast to users.
You need to be logged in EMCLI to be able to send these messages, if you are not you’ll get this error:

$ emcli send_system_broadcast -toOption=”ALL” -message=”OEM will be down for maintenance Friday December 30th”
Status:Unauthorized 401
As I said, you need to be logged in EMCLI:

$emcli login -username=sysman
Enter password:

Login successful

$ emcli send_system_broadcast -toOption=”ALL” -message=”OEM will be down for maintenance Friday December 30th”
Successfully requested to send System Broadcast to users.
Here’s the verb syntax:
emcli send_system_broadcast
      -toOption=”ALL|SPECIFIC”
      [-to=”comma separated user names”]
      [-messageType=”INFO|CONF|WARN|ERROR|FATAL” (default is INFO)]
      -message=”message details”
[ ]  indicates that the parameter is optional.
Thank you and happy new year!
Alfredo

ORA-01555 query duration 0 seconds with Dataguard

How many times we have calls from users complaining about their process that failed due to an ORA-01555 error?

We know that if the queries are not well tuned and they modify a lot of data, the image held in the UNDO Tablespace could not be consistent with the real data. But have you ever seen this error right away after executing a SQL statement against a table?
I just did couple of days ago. Here’s the story:
ORA-01555 error appeared in the alertlog’s database with a query duration of 0 seconds.
ORA-01555 caused by SQL statement below (SQL ID: d3rt4tyudufeu, Query Duration=0 sec, SCN: 0x034f.34f660b4)
Any queries plus an analyze table failed right away with ORA-01555:
ERROR at line 1: ORA-0155: snapshot too old: rollback segment number 10 with name “SYSSMU11_1072300523734$” too small

So weird.
After researching a bit on MOS, found a note regarding a bug.
Some minutes later we also started to receive ORA-600 errors related so scn numbers.
ORA-error stack (00600[ktbdchk1: bad dscn])
The MOS note mentions the ORA-01555 and the ORA-600 errors as part of bug 22241601 with a Dataguard configuration. Is worth to mention that yes, we were doing switchover testing recently in this 12.1.0.2 environment.
ALERT Bug 22241601 ORA-600 [kdsgrp1] / ORA-1555 / ORA-600 [ktbdchk1: bad dscn] / ORA-600 [2663] due to Invalid Commit SCN in INDEX (Doc ID 1608167.1)
The solution is to apply the patch but there’s also a tested workaround that is to rebuild online all the indexes of that table.
Hope this helps.

Alfredo

CRS-2632: There are no more servers to try to place resource ‘resource_name’ on that would satisfy its placement policy

I just got this error from CRS while trying to start a database using srvctl. I find this error kind of missleading as the error doesn’t tell what is really happening with the resource.
I suggest you to manually check the logs of the resource. In this case it had to do with a cluster database that one of the instances was not able to start. I tried to start this instance manually and then I got the real error.
The instance was having a missconfiguration in the parameter file that prevented it from starting.
Hope this note will provide you a guidance while having this CRS-2632 error coming out from CRS.
Thanks,

Alfredo

WAIT_FOR_GAP. How to restore missing archivelogs from backup?

In a Dataguard configuration, Oracle’s RFS (Remote File Server) writes redo data to the standby. When for any reason it can’t write this data, MRP (Managed Recovery Process) will wait for the archivelog to be applied and have the status “WAIT_FOR_LOG”. This will lead the standby to be out-of-sync with the primary database.
Sometimes some archivelogs can’t be transferred from primary database to the standby leaving a gap in the archivelog sequence. The MRP process will have the status “WAIT_FOR_GAP”.  
In order to fix the archivelog gap we have to manually transfer the archivelogs missing.
To find the gap you can query v$archive_gap (gv$archive_gap for RAC).
SELECT INST_ID, THREAD#, HIGH_SEQUENCE#, LOW_SEQUENCE# FROM GV$ARCHIVE_GAP;
INST_ID       THREAD#       HIGH_SEQUENCE#       LOW_SEQUENCE#
————- ————— ———————— ————————
2             2             823                  811
You can see that we are missing archivelogs from sequence 811 to 823 for thread 2. If these archivelogs are not available in the primary we have to restore them from backup.
RMAN> RESTORE ARCHIVELOG FROM SEQUENCE 811 UNTIL SEQUENCE 823 THREAD=2;
Keep in mind that parameter THREAD defaults to 1, so you must specify the thread number when you are trying to restore from a different thread.
After restoring these archivelogs the RFS process should transfer them automatically to the standby. Verify if the gap is fixed.
Thanks,

Alfredo